Usage Overview
High-Level overview of how the Privakey IDS service is used
The goal of this page is to show how one uses the Privakey IDS API and to provide a broad understanding of the system. The flow used on this page is:
- Retrieve an existing user's identifier
- Enable Privakey for that user
- Challenge that user
- Receive that user's response to the Challenge
Simple Bind and General Challenge Flow

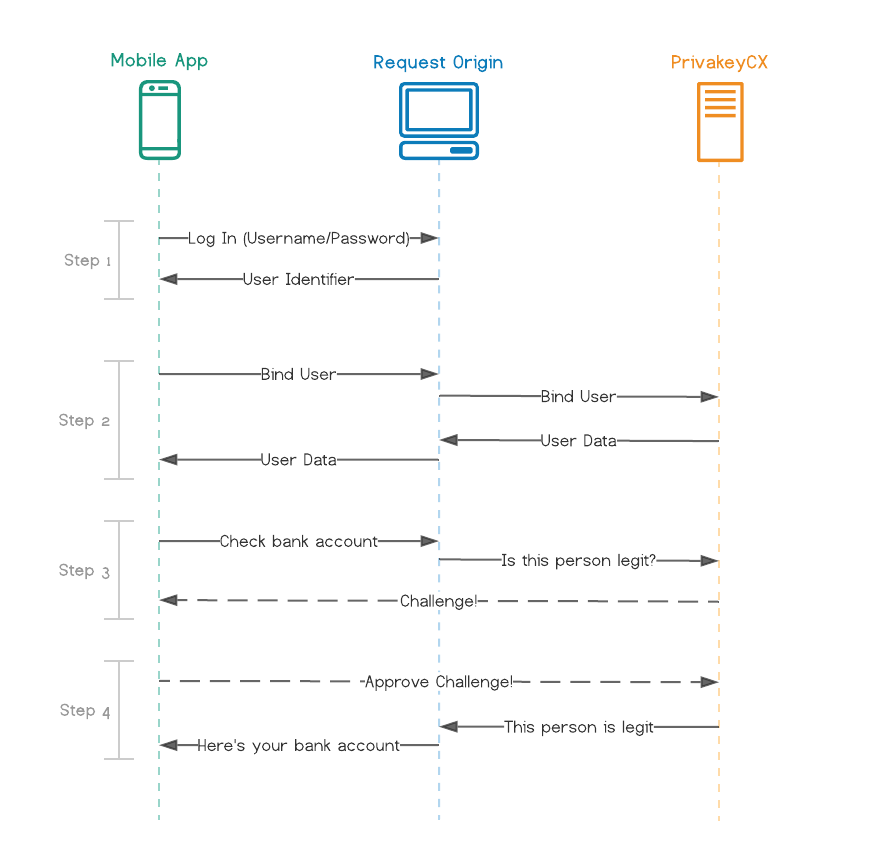
Figure 3: General Flow Overview with Simple Bind
(click to enlarge)
1. Retrieve an existing user's identifier
Figure 4: Retrieving User's Identifier
In order to enable Privakey for a user, you'll need that user's unique identifier. In your system, each user likely already has a unique identifier. This could be an int, a GUID, an email, etc. This identifier will be passed from the user's app to your Request Origin, and finally to the Privakey CX Auth Service.
The typical way to get a user's identifier is to have them log in to the service from their app. When they do so, you'll return some info back to the Mobile App. Part of this info should be their unique identifier.
2. Enable Privakey for that user
Figure 5: Enabling Privakey
Using the identifier retrieved in Step 1, the next step is to Enable Privakey for that user. This process is called Binding, because it binds one of your accounts to a Privakey account.
The Binding process must be started from one of your Request Origins. This is for security reasons, which are detailed further in the documentation. However, the Request Origin doesn't already know which user to Bind. Thus, the Mobile App tells the Request Origin which user it wants to Bind. The Request Origin forwards this info to Privakey CX, which performs the Bind operation. If successful, Privakey CX responds with some data that the Request Origin must send to the Mobile App. The Mobile App then finishes the binding process in the background (not shown in Figure 3).
The user is now set up to use Privakey CX!
3. Challenge that user
Figure 6: Challenging a User
When the user wants to do something high stakes, like check their bank account, you can now Challenge them. This will send the user a notification and let them act upon the Challenge. You should put their attempted action on hold until you get the result of the Challenge. Which brings us to...
4. Receive that user's response to the Challenge
Figure 7: Receiving a user's response to a Challenge
When the user acts upon the Challenge, Privakey CX will (optionally) let your Request Origin know. At this point, you can proceed with the attempted action (E.G. show them their bank account).
Identity Provider Flow

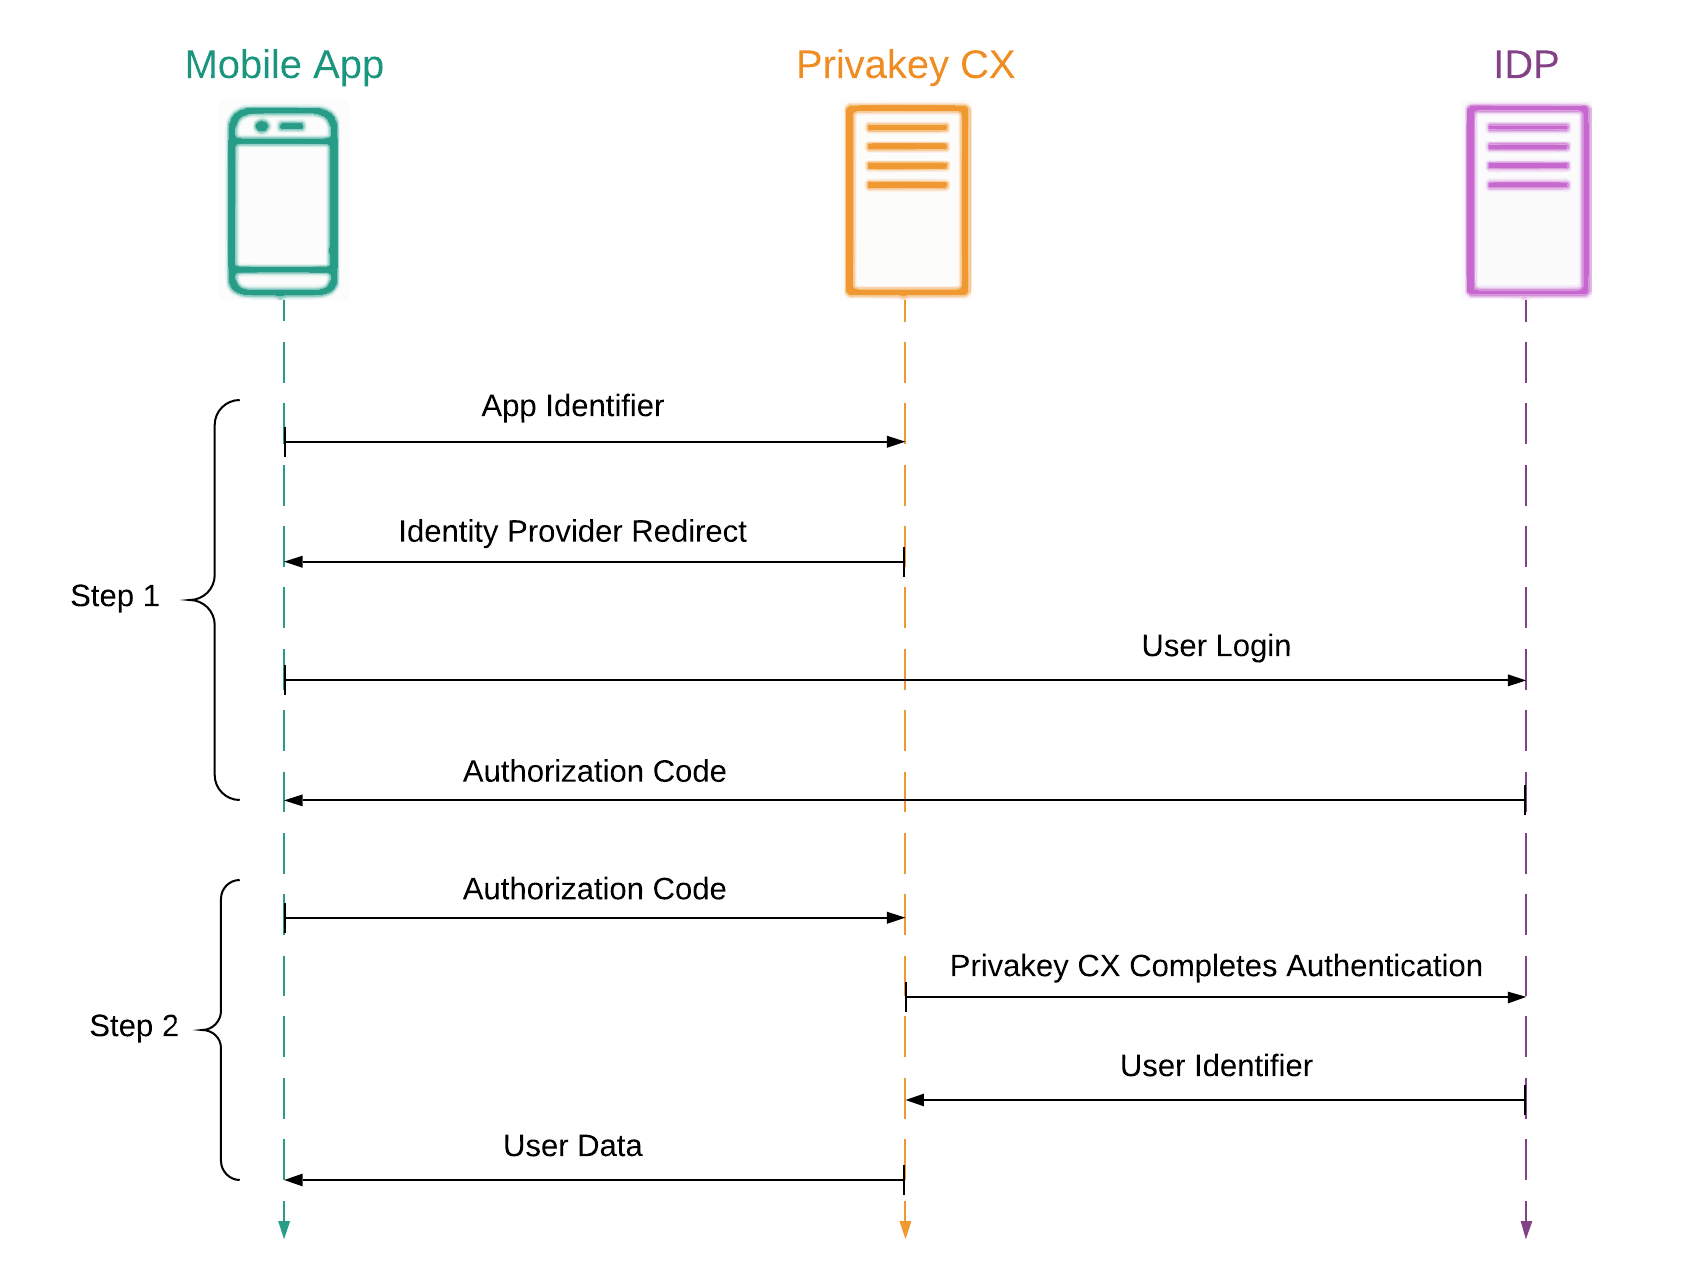
Figure 8: The flow of IDP binding.
1. Initiate authentication on the Identity Provider

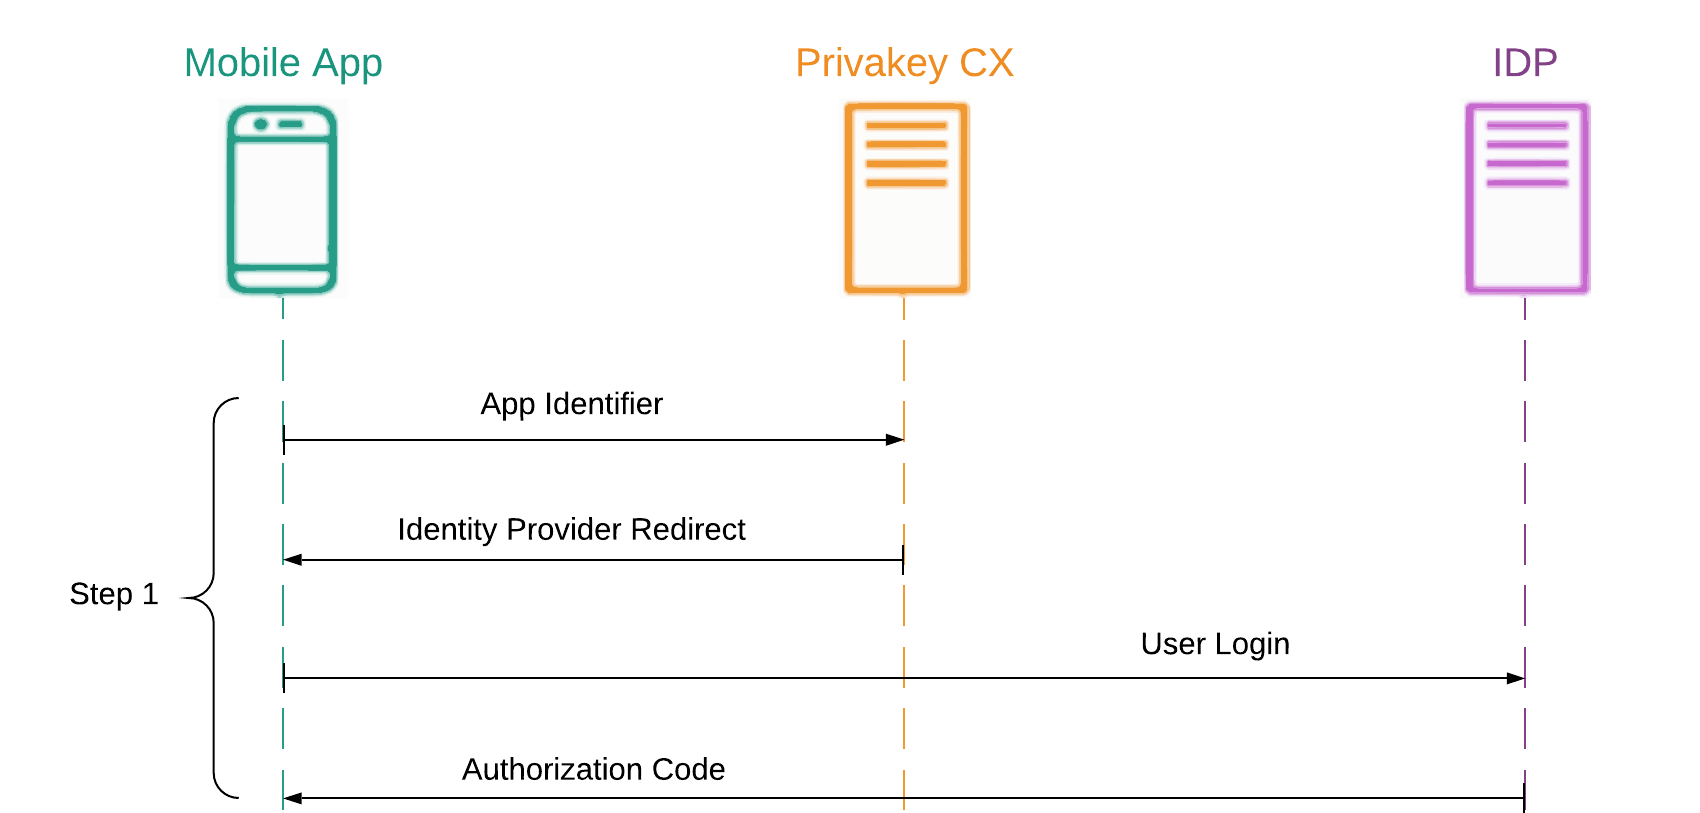
Figure 9: Initiating the bind process by beginning authentication of the Identity Provider.
Privakey CX requires a unique user identifier, and to this end, it can obtain it from a supported Identity Provider. In order to do so, a Mobile App associated to an App Space that is configured to leverage an IDP may initiate the bind request. In doing so, the user will be redirected by the Auth Service on their device to the IDP's authentication page. There they can complete a login, allowing the app to use the first half of the authentication process in the next step.
2. Complete authentication and obtain the User's Identifier.

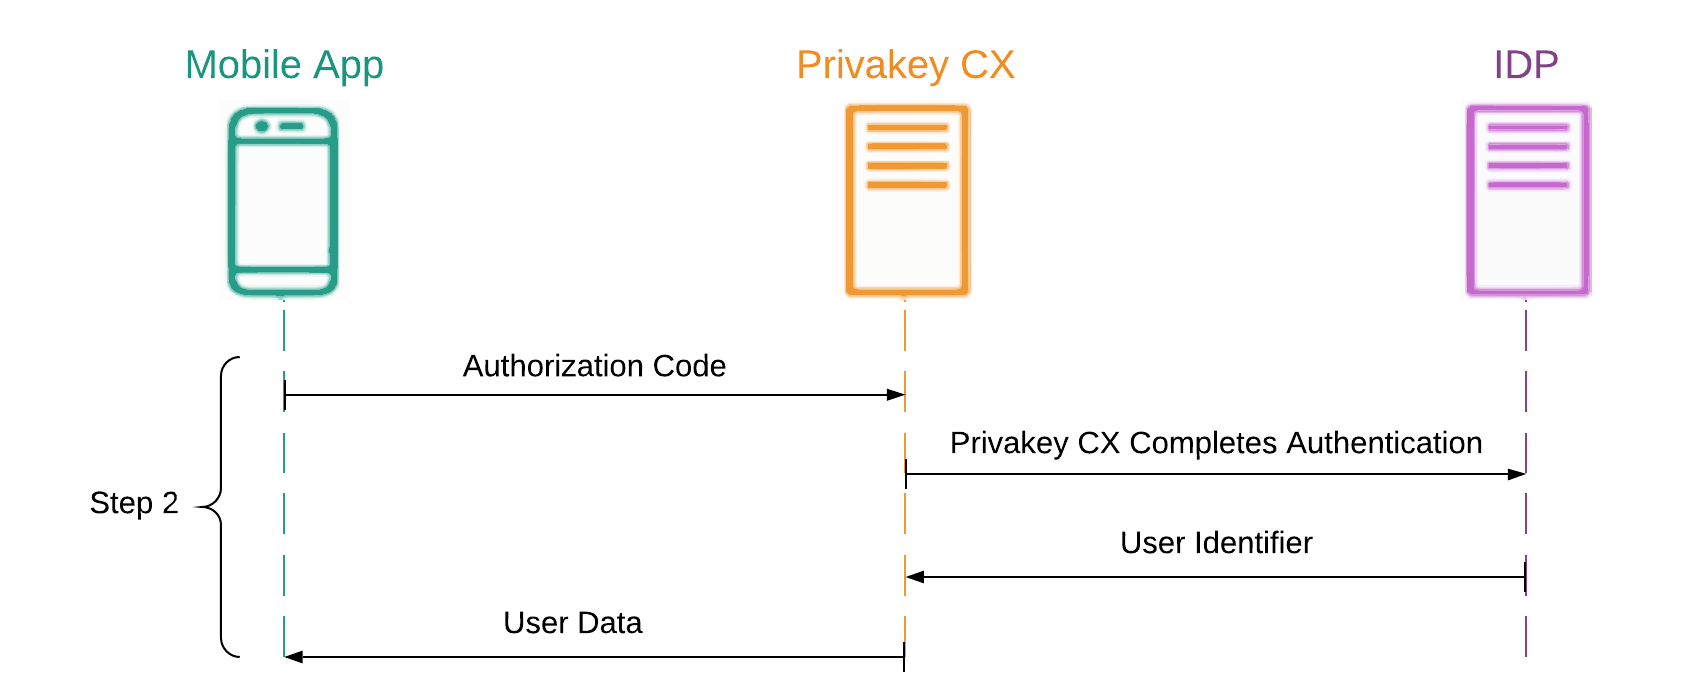
Figure 10: Privakey CX completes authentication on the user's behalf, and completes the bind process.
With the authorization credential served by the Identity Provider, the Mobile App will forward that information to Privakey CX, allowing it to complete the authentication process on behalf of the user. After brokering with the IDP, the user's identifier will be returned and stored on Privakey CX, which then instructs the Mobile App to complete the bind process. The Mobile App then finishes the binding process in the background (not shown in Figure 8).
After this, steps 3 and 4 proceed as normal.
That concludes the general flow using Privakey CX.
Updated almost 2 years ago
